Follow these steps to configure an Elastio policy for EFS protection.
Contents
- Access the Policies Menu
- Step 1: Name, Schedule, and Activation Settings
- Step 2: Choose Assets to Protect
- Step 3: Recovery Assurance, Recovery, and Scan Settings
- Step 4: Create
- Important Considerations
Access the Policies Menu
Navigate to the Policies section in the Elastio console.
Step 1: Name, Schedule, and Activation Settings
This screen defines the basic details for your protection policy, including its name, scan schedule, time zone, and activation timing.
Policy Name
Enter a descriptive name for your policy.
Choose a name that makes it easy to identify the purpose or scope of the policy (e.g., Daily EFS Ransomware Protection).
Schedule Frequency
Daily – Runs once every day at the set time.
Weekly – Runs once a week on the selected day and time.
Monthly – Runs once a month on the selected date and time.
Select the frequency that matches your organization’s protection requirements.
Protection Window Start
Sets the time the protection or scan begins based on the selected schedule frequency.
Use the clock icon to adjust the start time.
Time Zone
Defines the time zone for the schedule.
Select the appropriate time zone to ensure scans start at the correct local time.
Activation Settings
Choose when the policy becomes active:
Activate now – The policy takes effect immediately.
Pause until… – Delays activation until the specified date and time.
Step 2: Choose EFS Assets to Protect
In this step, you select the Elastic File System (EFS) volumes that will be protected by the policy.
Choose Scope
Dropdown Menu – Shows the number of currently selected EFS volumes.
Options allow filtering and bulk selection.
Asset Type Selection
EC2/EBS – Switch to select EC2 instances and EBS volumes.
S3 Bucket – Switch to select S3 buckets.
Select Option -> EFS – Displays available Elastic File Systems for selection (current view).
EFS List Table
Each row displays:
EFS – The name of the Elastic File System.
Account – AWS account ID and region where the EFS volume resides.
Policy – The currently assigned protection policy (if any).
-
Paths –
All Paths – Scans all files and directories within the EFS.
Select Paths… – Allows you to limit scanning to specific folders or directories.
Select Paths
The Select Paths dialog allows you to define specific folders or directories within an asset (EFS or S3 bucket) to include in protection scans. This lets you focus on high-priority data instead of scanning the entire asset.
Description
A path is the folder name you want to protect.
You can use regular expressions (regexp) to match all folders with the same name, regardless of their parent folder.
Example:
/*/foldername/filesThis pattern matches all folders named foldername under any directory.
Use the checkboxes in the first column to select the EFS volumes you want to protect.
Tip:
Selecting All Paths ensures complete coverage of the EFS volume, while Select Paths… can be used to focus protection on high-priority directories and reduce scan duration.
Step 3: Recovery Assurance, Recovery, and Scan Settings
This step allows you to configure how Elastio detects threats, validates data integrity, and manages recovery points for your EC2 assets.
Recovery Assurance Settings
These settings define how Elastio protects your backups and ensures recovery readiness:
Zero-Day Ransomware Detection
Uses a 3-layered behavioral machine learning model to detect never-before-seen ransomware. Models are continuously updated with the latest ransomware research from our security lab.Encryption Detection
Identifies internal threats by detecting newly encrypted or suspiciously modified files. Uses behavioral analysis to compare file changes between scans, flag encryption activity, and analyze file types for signs of compromise.Malware Signature Scan
Detects known threats including ransomware payloads, Trojans, spyware, adware, and crypto-miners. Signature databases are updated frequently (up to hourly) to ensure maximum protection.
EFS Settings
These options control scanning behavior for EFS file systems:
-
Scan objects uploaded after a specific time (optional)
Limits scanning to files created or modified after the specified date and time.
Helps reduce scan duration by excluding older data already verified as safe.
Use the calendar and clock controls to set the exact cutoff.
Tip:
For maximum protection, keep all Recovery Assurance settings enabled. Use the date/time filter for targeted scans when working with large EFS volumes to reduce processing time.Tip:
Step 4: Create
Important Considerations
-
EFS Mount Points Configuration:
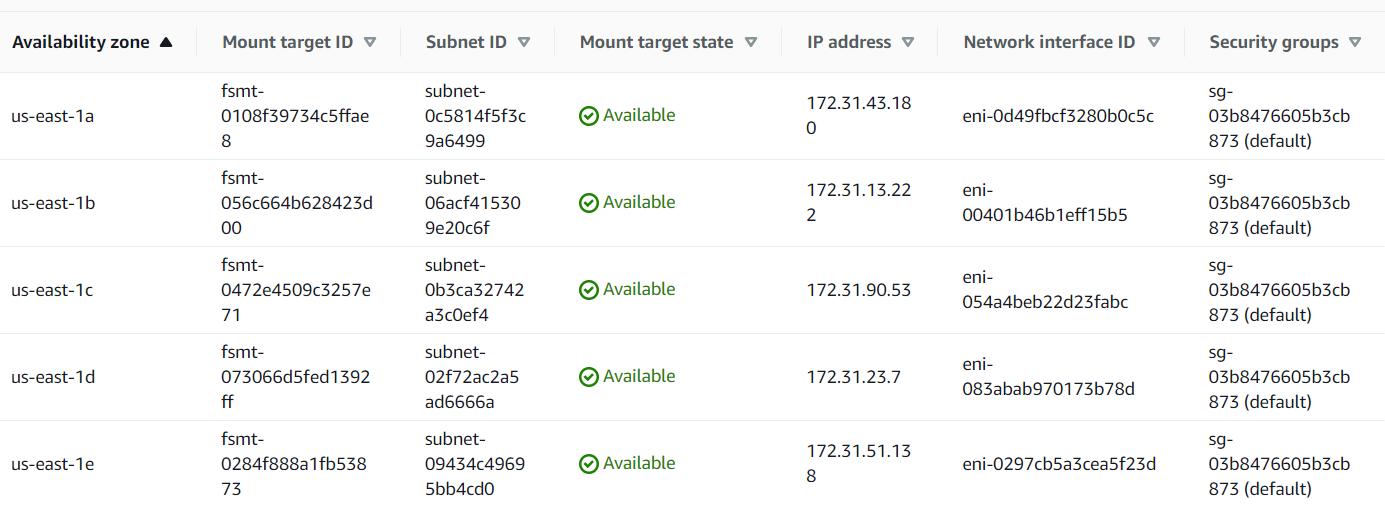
- EFS mount points must be available in all subnets where the Elastio vault is installed for the protection to function correctly.
- These mount points can be configured during EFS creation or added later as needed.
- Refer to the example list of mount points below:
-
Asset Count Display in Policies Table:
- The asset count in the Policies Table will display as
0until the first policy run is completed.
- The asset count in the Policies Table will display as